Here i will show how you can setup a SAN storage using Openfiler to use with VMware Workstation.
- Install Openfiler as a separate VM.
- Once successfully installed the Openfiler you will get the screen below.
4. Before this ensure the httpd service and openfiler service is running, if not start those services by running the following commands.
5. Run the below commands to make those services started after every restart.
6. Login to the openfiler with the default username & password which is username as ‘openfiler’ and password as ‘password’.
7. Click on the Volumes tab to see the physical disks attached to the openfiler.
8. Click on the /dev/sda to create a physical volume and then click on the Create button to create a physical volume of 6 GB as shown below in example.This will create a physical volume of 6 GB.
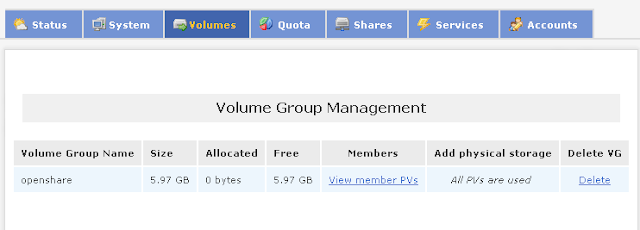
9. Now we have to create a volume group to be used for our storage. Click on the Volumes tab and then select ‘Volume Groups’ from the ‘Volume section’ menu on the right hand side.you will get the screen like below.
10. Enter a namein volume group name in text box provided and select the physical volume to be added by selecting the checkbox and click the ‘Add volume group’ Button.
11. Once done you will get the screen like below.
12. Now we have to create a volume from the volume group. Click the Volumes tab and select the ‘Add Volume’ on the right side of the menu.This wil bring you the screen as shown below. Select the Volume which was created in the previous step
13. Click on the Change button and you will get the screen below. Enter a volume name and a volume description & enter the size by inputting the required size or use the sliding bar to mention the size of the volume and select the Filesystem /Volume type as ‘iSCSI’.
14. Click on the Create button to create the volume in the volume group, in this example i utilized the entire 6 GB space to create volume and you will be presented with the screen below.
15. Now we had setup the volume in openfiler to be used for the network/hosts. Click on the Services tab and enable the ‘iSCSI Target Server’ as shown below by clicking the ‘enable’ button.
16. Now add the iSCSI Target by going to the Volumes tab and select the ‘iSCSI Targets’ from the right side menu and you will get the screen below. Click on the Add button to create a iSCSI Target in the Target Configuration tab
17. Once done click the LUN Mapping tab.Now we have to map the LUN by clicking the ‘Map’ button as shown below.
18. Now we have to setup the storage to be available for a single host or network by going to the Systems tab and selecting the ‘Network Access Configuration’.Here enter the ip address of the host from where you want to access the openfiler or enter the subnet address which the openfiler has to to accept the traffic. Enter a name for the storage and ensure the type is selected as ‘share’ and click the Update button.
19. Now go to the Volumes tab and select ‘Network ACL’.Here we can found the storage which we created in the previous step. Select ‘Allow’ from the access drop down list and click Update button as this will allow the iSCSI Target to be accessed by the host or the subnet which we setup earlier.

20. That’s it…Now we have successfully created a Openfiler SAN Storage for VMware ESX/ESXi .


No comments:
Post a Comment